Install FlexiSPY on Non-Rooted Android
BEFORE YOU START
- Check OS compatibility here.
- Be sure you have any passwords necessary to access the phone after a restart.
- Installation steps may vary depending on device.
Purchase our Installation Service andlet us do the hard work for you!
find out more
Purchase our Installation Service and let us dothe hard work for you!
find out more
BEFORE YOU START
Open Play Store and tap the Profile icon
Tap Play Protect
Tap Settings at the top right
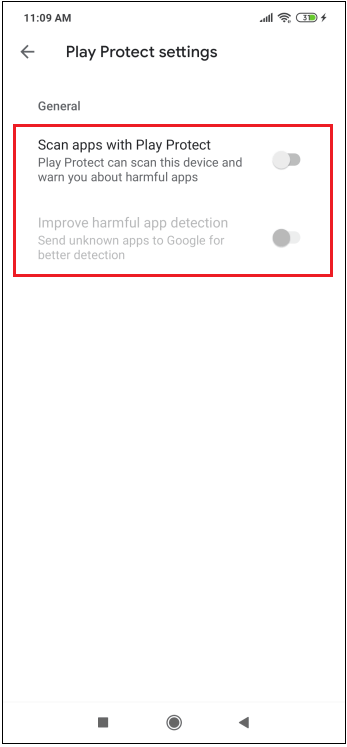
Turn OFF the below options
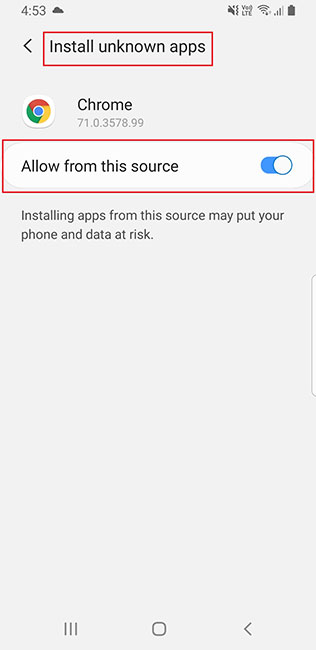
For Android OS 9 and Above, go to Settings, search for Special app access > Tap Special app access > Tap on Install unknown apps > Select browser that you will be using for download software. For example: if you are using Chrome for download, tap Chrome and enable Allow from this source.
For Android OS 8, go to Settings, search for Install unknown apps and tap on the browser that you will be using for download software. For example: if you are using Chrome for download, tap Chrome and enable Allow from this source.
For Android OS 9 and Above, Go to Settings > search for 'Special access' > Tap Install unknown apps and tap on the browser that you will be using for download software. For example: if you are using Chrome for download, tap Chrome and enable Allow from this source.
For Android OS 8, Go to Settings > search for 'Install unknown apps' > Tap on Install unknown apps > and tap on the browser that you will be using for download software. For example: if you are using Chrome for download, tap Chrome and enable Allow from this source.
Go to Settings > Advanced settings > Security and make sure Unknown Sources is enabled.
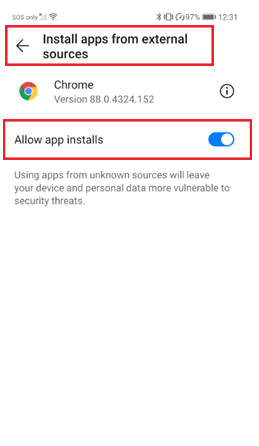
For Android OS 8 and Above, go to Settings > security > more settings > install apps from external sources and tap on the browser that you will be using for download software. For example: if you are using Chrome for download, tap Chrome and enable Allow from this source.
Go to Settings, search for Special app access > Tap Special app access > Tap on Install unknown apps > Select browser that you will be using for download software. For example: if you are using Chrome for download, tap Chrome and enable Allow from this source.
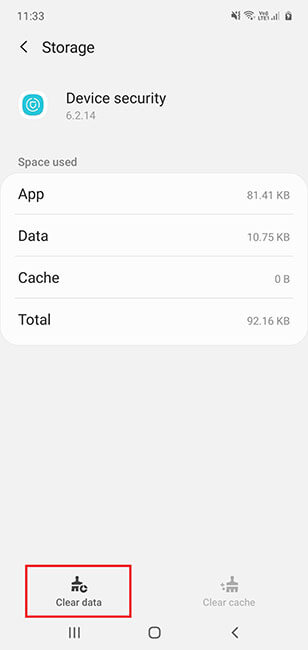
For Android OS 11 Devices and Above Go to Settings > Apps, then Tap Device care > Storage > Manage Storage > Clear data
For Android OS 7-10 Devices Go to Settings > Apps, tap (three dot icon on the top right), then tap Show system apps > Device security > Storage > Clear data > Delete/ OK
This is to avoid warnings which may otherwise randomly appear. Disabling Notifications does not disable Play Store or prevent normal app updates.
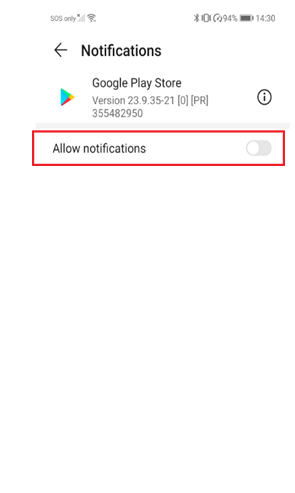
For Android OS 14: Go to Settings > Notifications > App Notification > Google Play Store and tap the slider to disable it. Tap on Google Play Store to open the menu and confirm Notification are disabled.
For Android OS 9 - 13: Go to Settings > Notifications (click “see all”) > Google Play Store, and tap the slider to disable it. Tap on Google Play Store to open the menu and confirm Notification are disabled.
For Android OS 8 and Below: Go to Settings > Apps & Notifications > Notifications (scroll down to Google Play Store), and tap the slider so it reads “Off”.
Some Devices may have slightly different navigation to the Notifications menu.
This is to avoid warnings which may otherwise randomly appear. Disabling Notifications does not disable Play Store or prevent normal app updates.
For Android OS 8 and Above: Go to Settings > Apps > Tap Apps (scroll down to Google Play Store) > Notifications, and tap the slider so it reads “Off”.
Some Devices may have slightly different navigation to the Notifications menu.
This is to avoid warnings which may otherwise randomly appear. Disabling Notifications does not disable Play Store or prevent normal app updates.
For Android OS 14: Go to Settings > Notifications > App Notification > Google Play Store and tap the slider to disable it. Tap on Google Play Store to open the menu and confirm Notification are disabled.
For Android OS 12 - 13: Go to Settings > Apps (click “see all”) > Google Play Store > Notifications, and tap the slider to disable it.
For Android OS 9 - 11: Go to Settings > Apps & Notifications (click “see all”) > Google Play Store > Notifications, and tap the slider to disable it.
For Android OS 8 and Below: Go to Settings > Apps & Notifications > Notifications (scroll down to Google Play Store), and tap the slider so it reads “Off”.
Some Devices may have slightly different navigation to the Notifications menu.
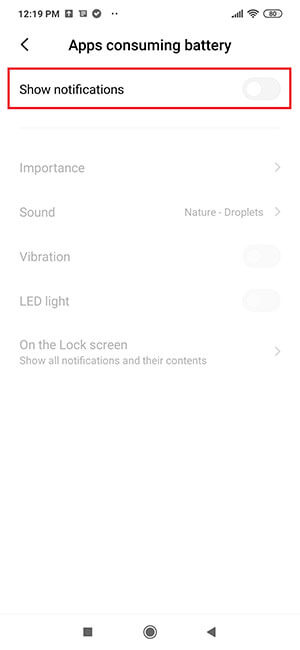
This is to avoid warnings which may otherwise randomly appear. Disabling Notifications does not disable Play Store or prevent normal app updates.
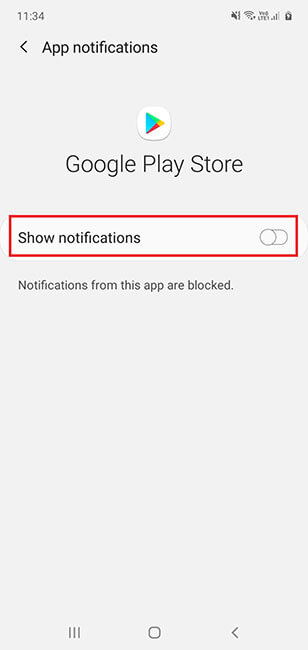
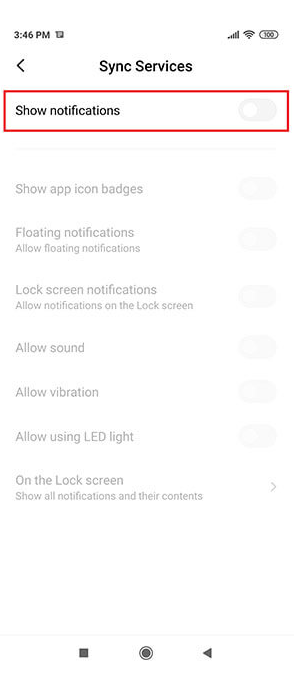
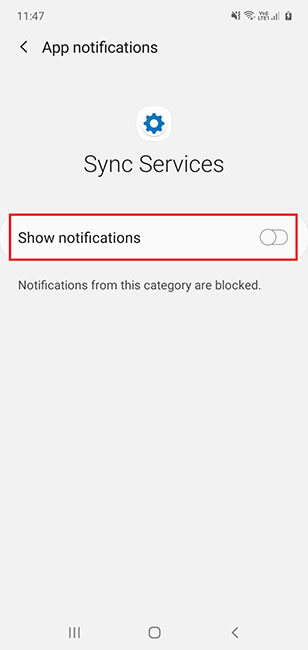
For Android OS 9 and Above: Go to Settings > Notifications > Google Play Store > Show notifications and turn OFF
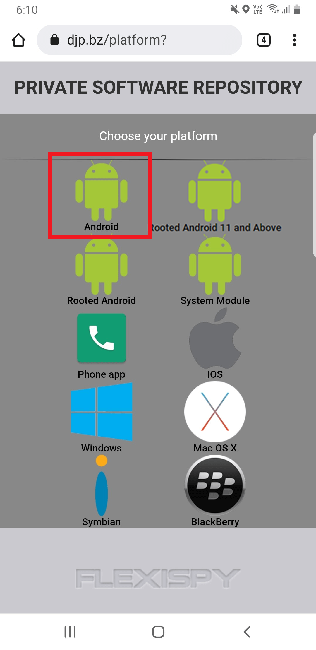
Open up your phone internet browser and navigate to the website https://djp.bz/. At the Private Software Repository screen, add a check in the box for “I am a customer and I have a license code”, then tap View all software. Tap on the Android icon to start the download. Once the download has completed tap the file to begin installation.
Tap Install. Once installation has completed, tap Open when the option appears.
If you cannot tap Open and can only tap Done, this indicates the software is already installed. If you are reinstalling the software, you must first uninstall the previous version.
To uninstall the previous version, go to Settings > Application Manager > com.android.system.service or sync services (for software version 4.0.3 and Above) and tap Uninstall. We recommend restarting the phone after uninstalling. You may then start a new installation.
If when installing, you see an error that the app cannot be installed, you will need to perform the following steps:
Tick I accept license agreement and then tap Continue
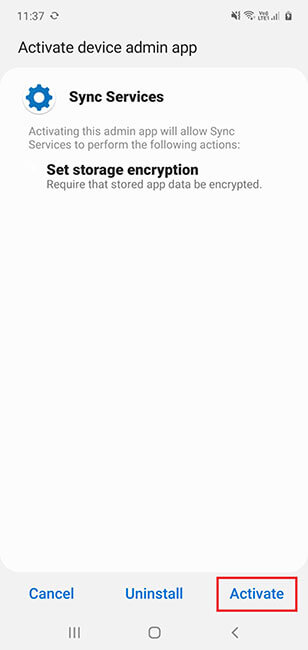
This grants the software additional local permissions making it more secure and less likely to be uninstalled.
Tap Activate this device admin app to continue.
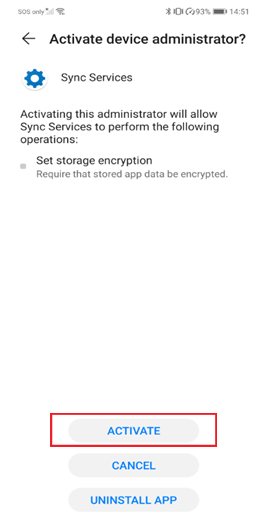
This grants the software additional local permissions making it more secure and less likely to be uninstalled.
Tap Activate to continue.
This grants the software additional local permissions making it more secure and less likely to be uninstalled.
Tap Activate to continue.
This grants the software additional local permissions making it more secure and less likely to be uninstalled.
Tap Activate this device admin app to continue.
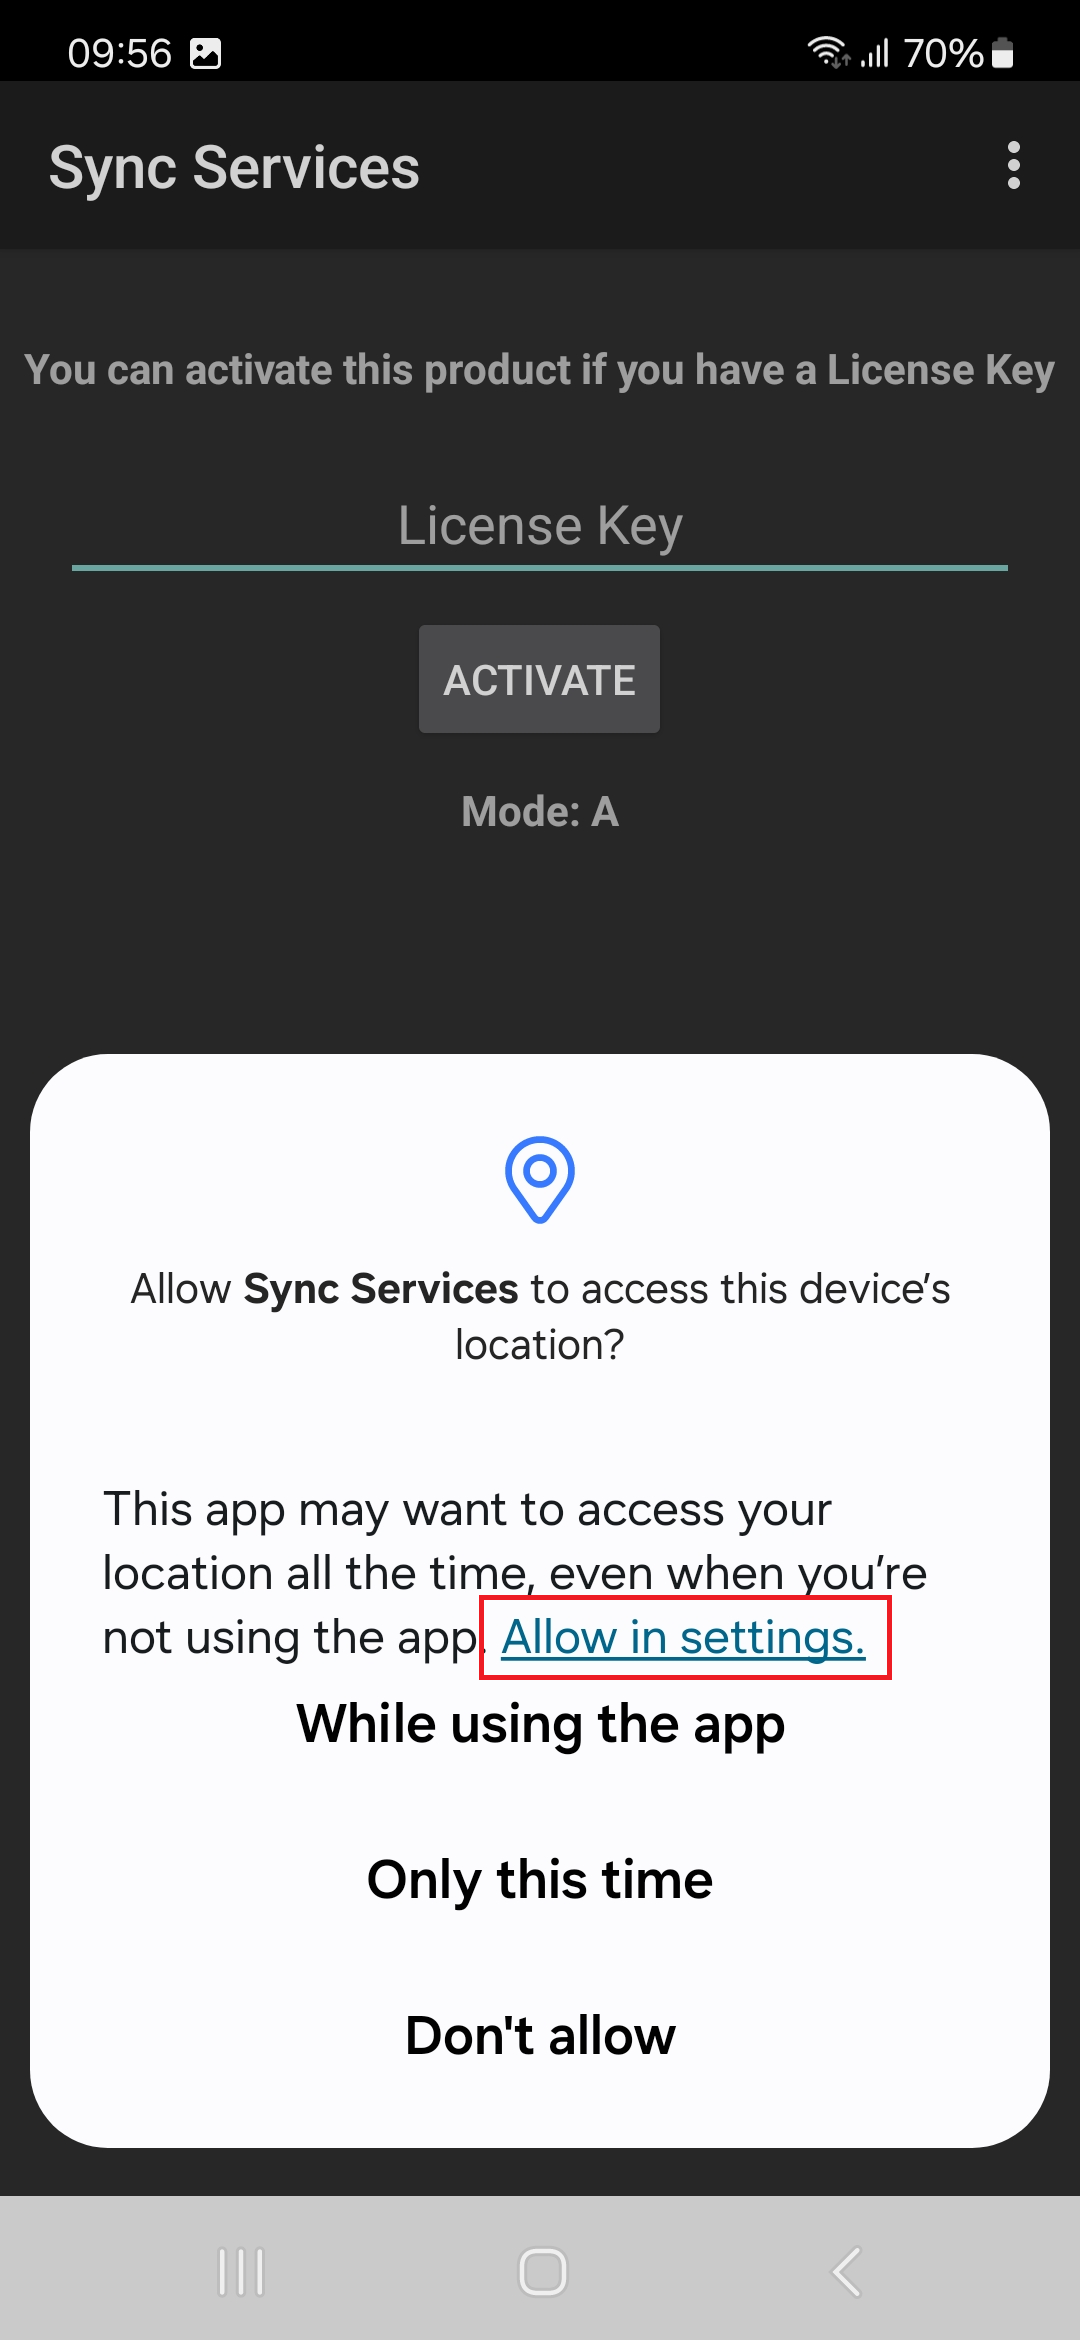
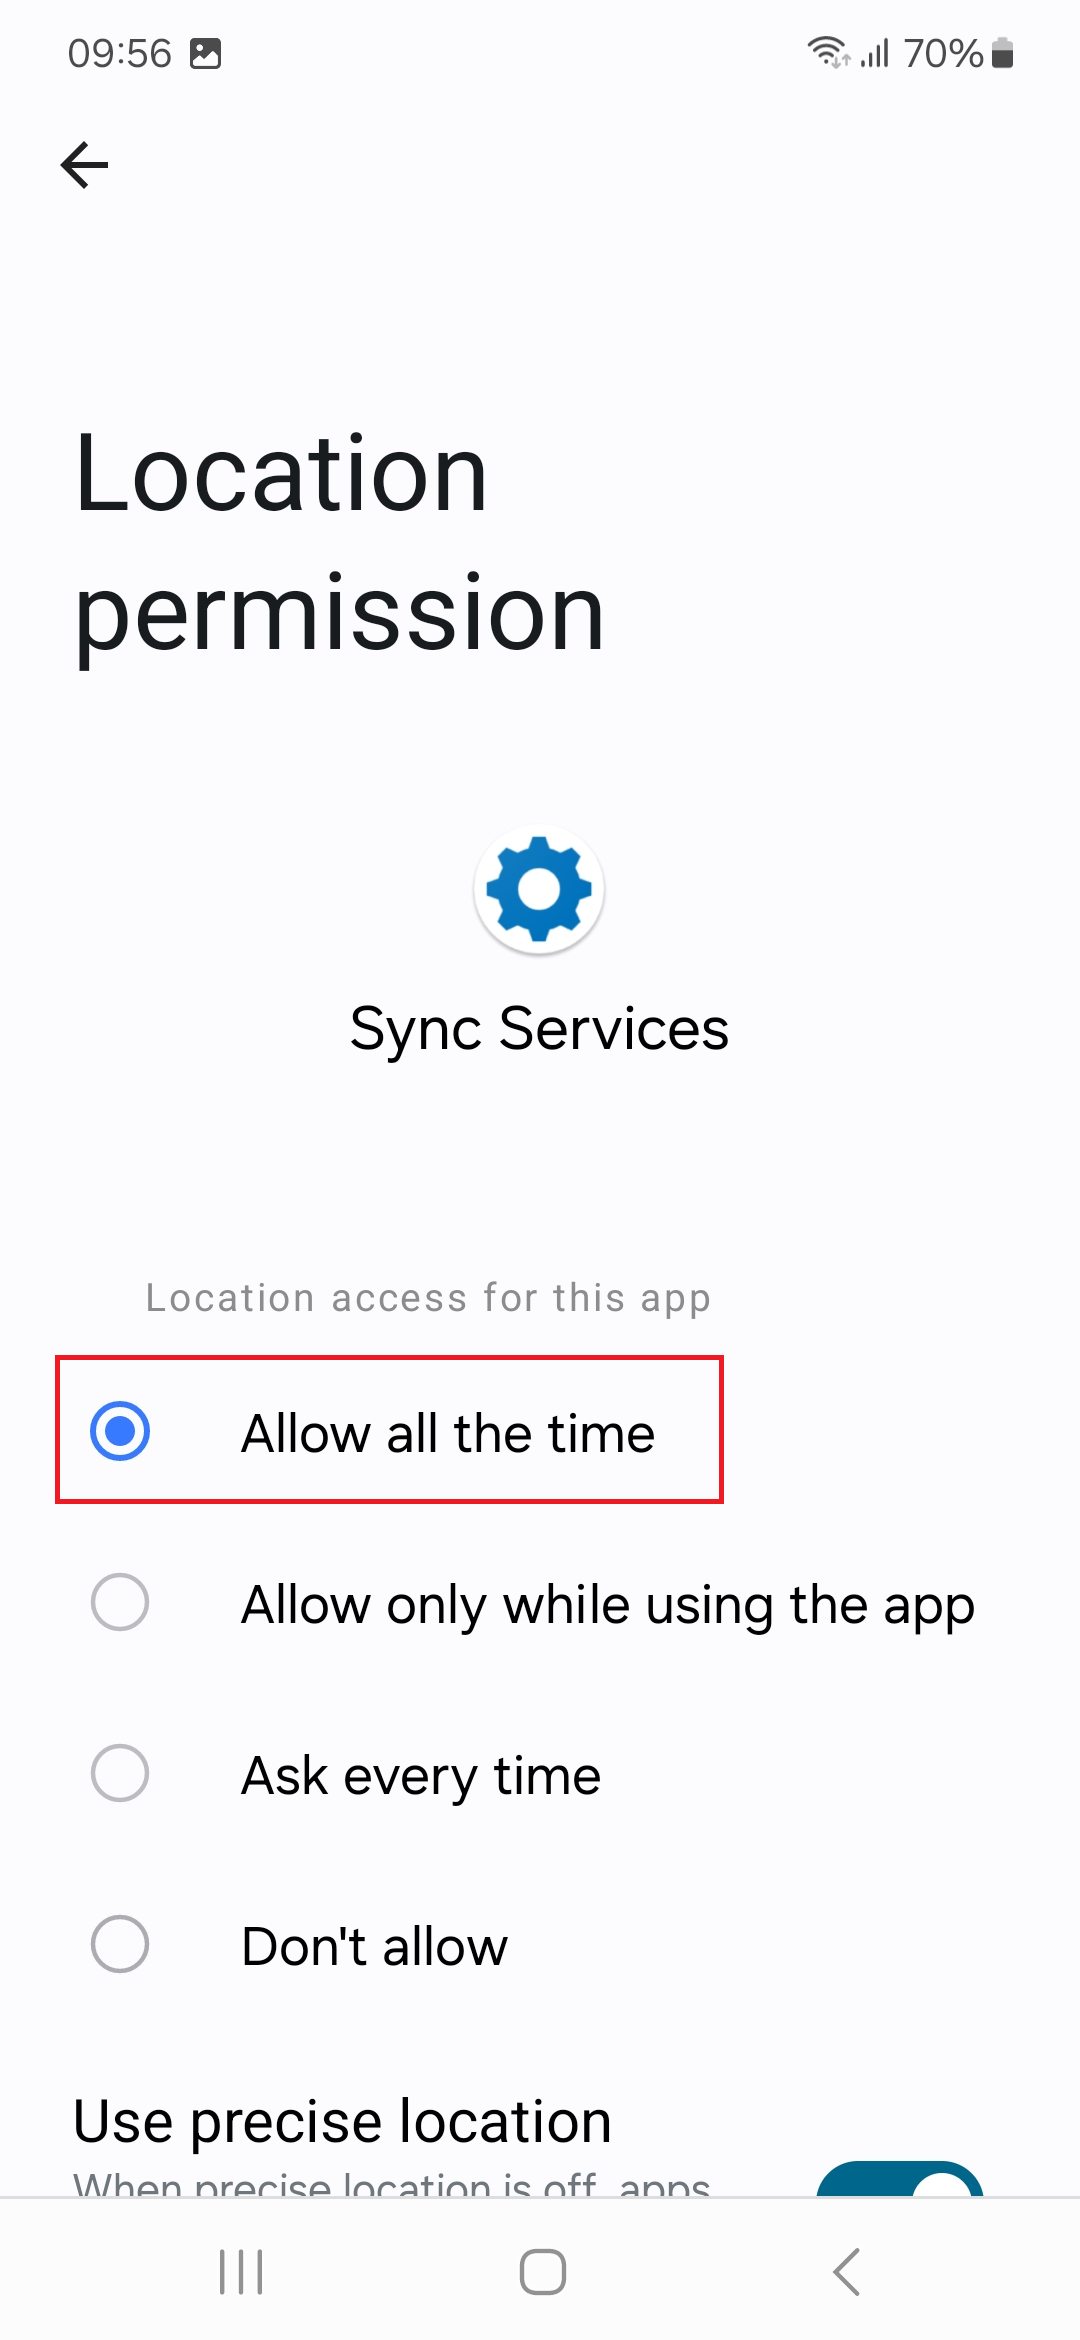
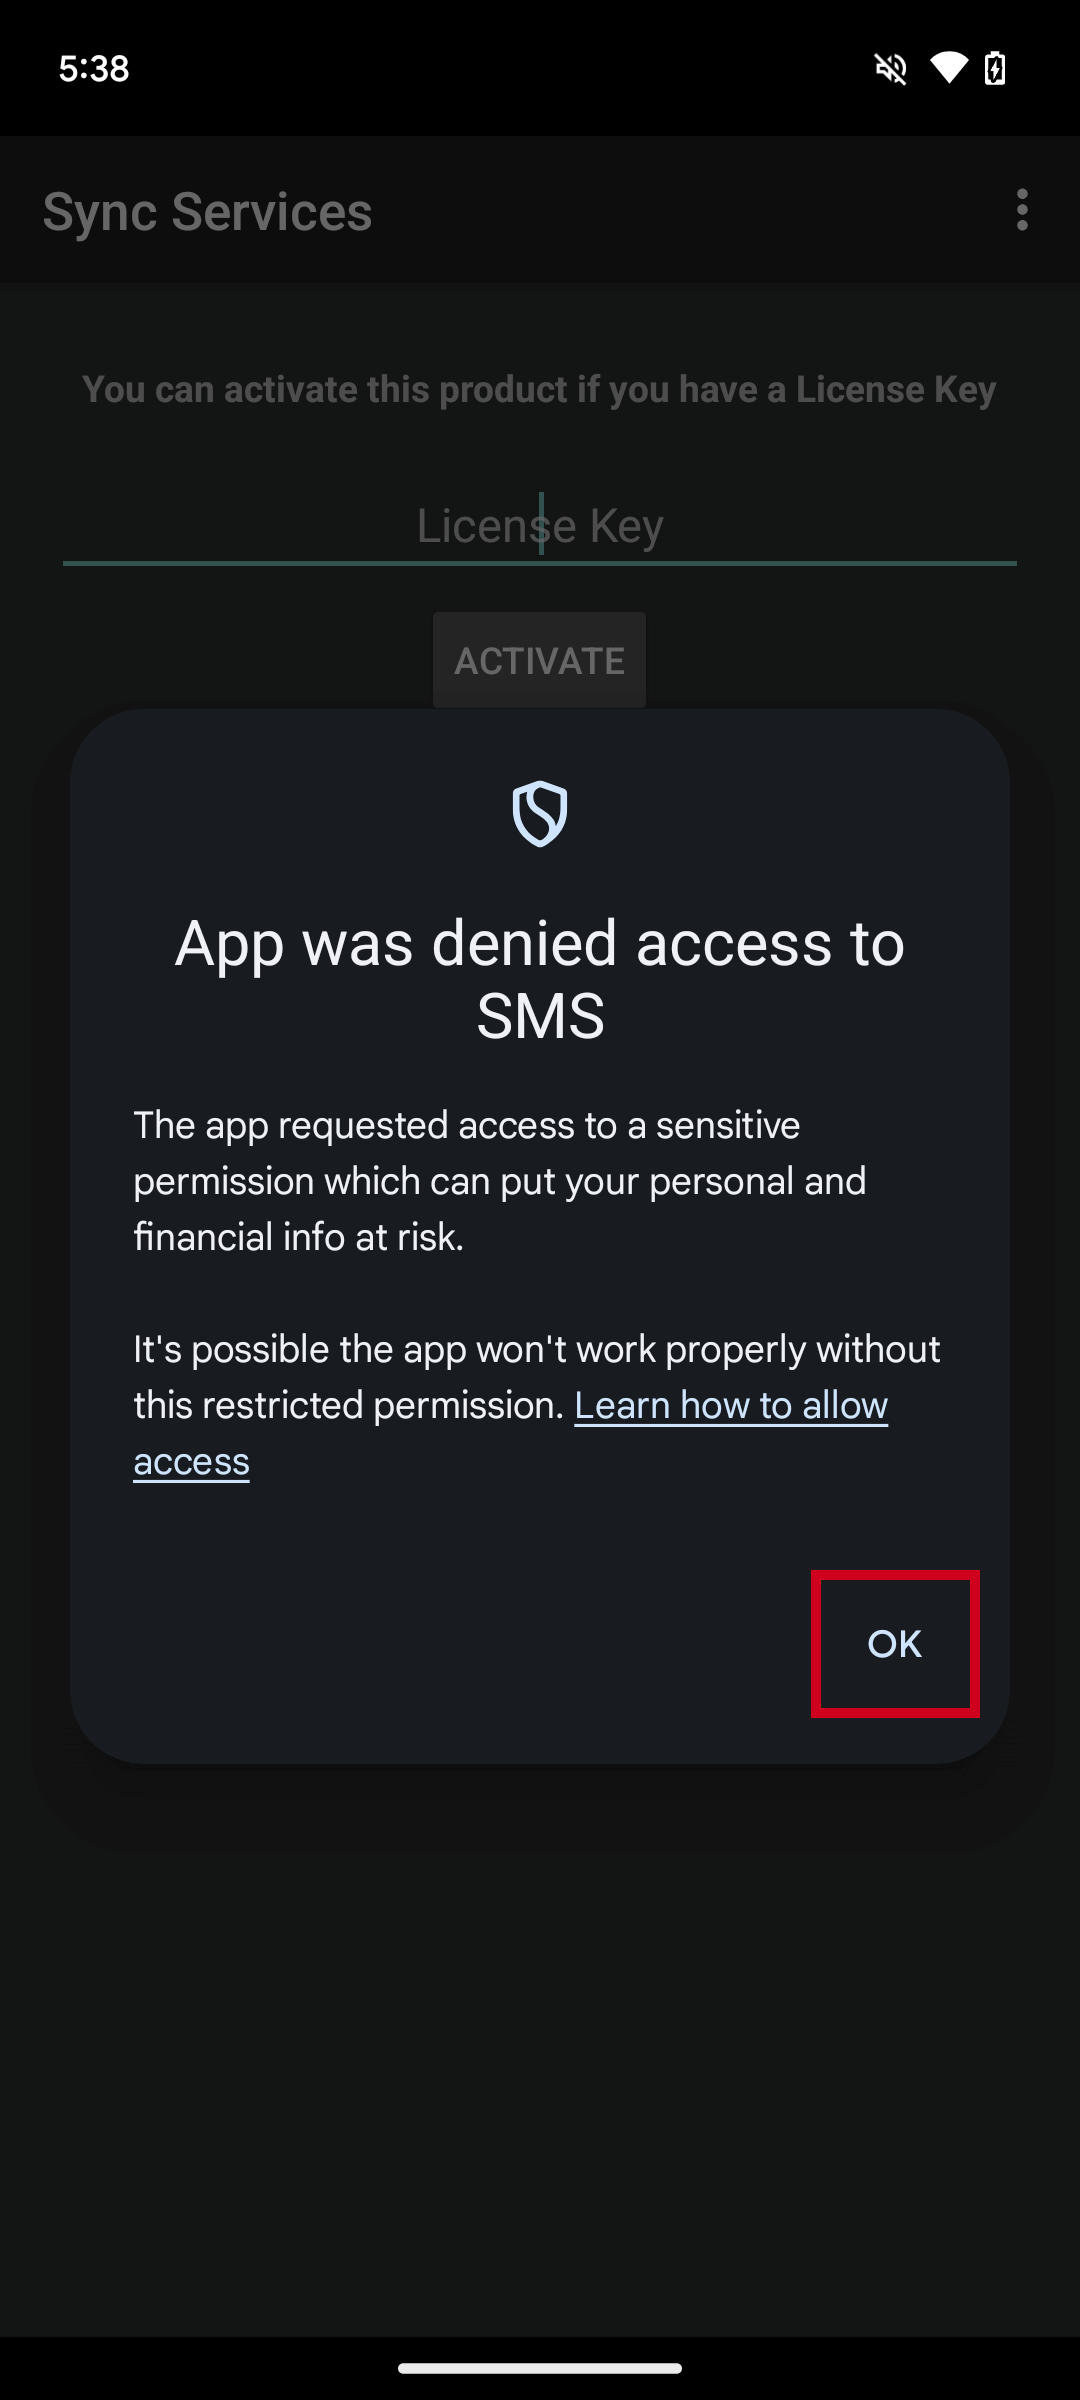
You will be asked to grant a series of permissions. tap “Allow” on all prompts
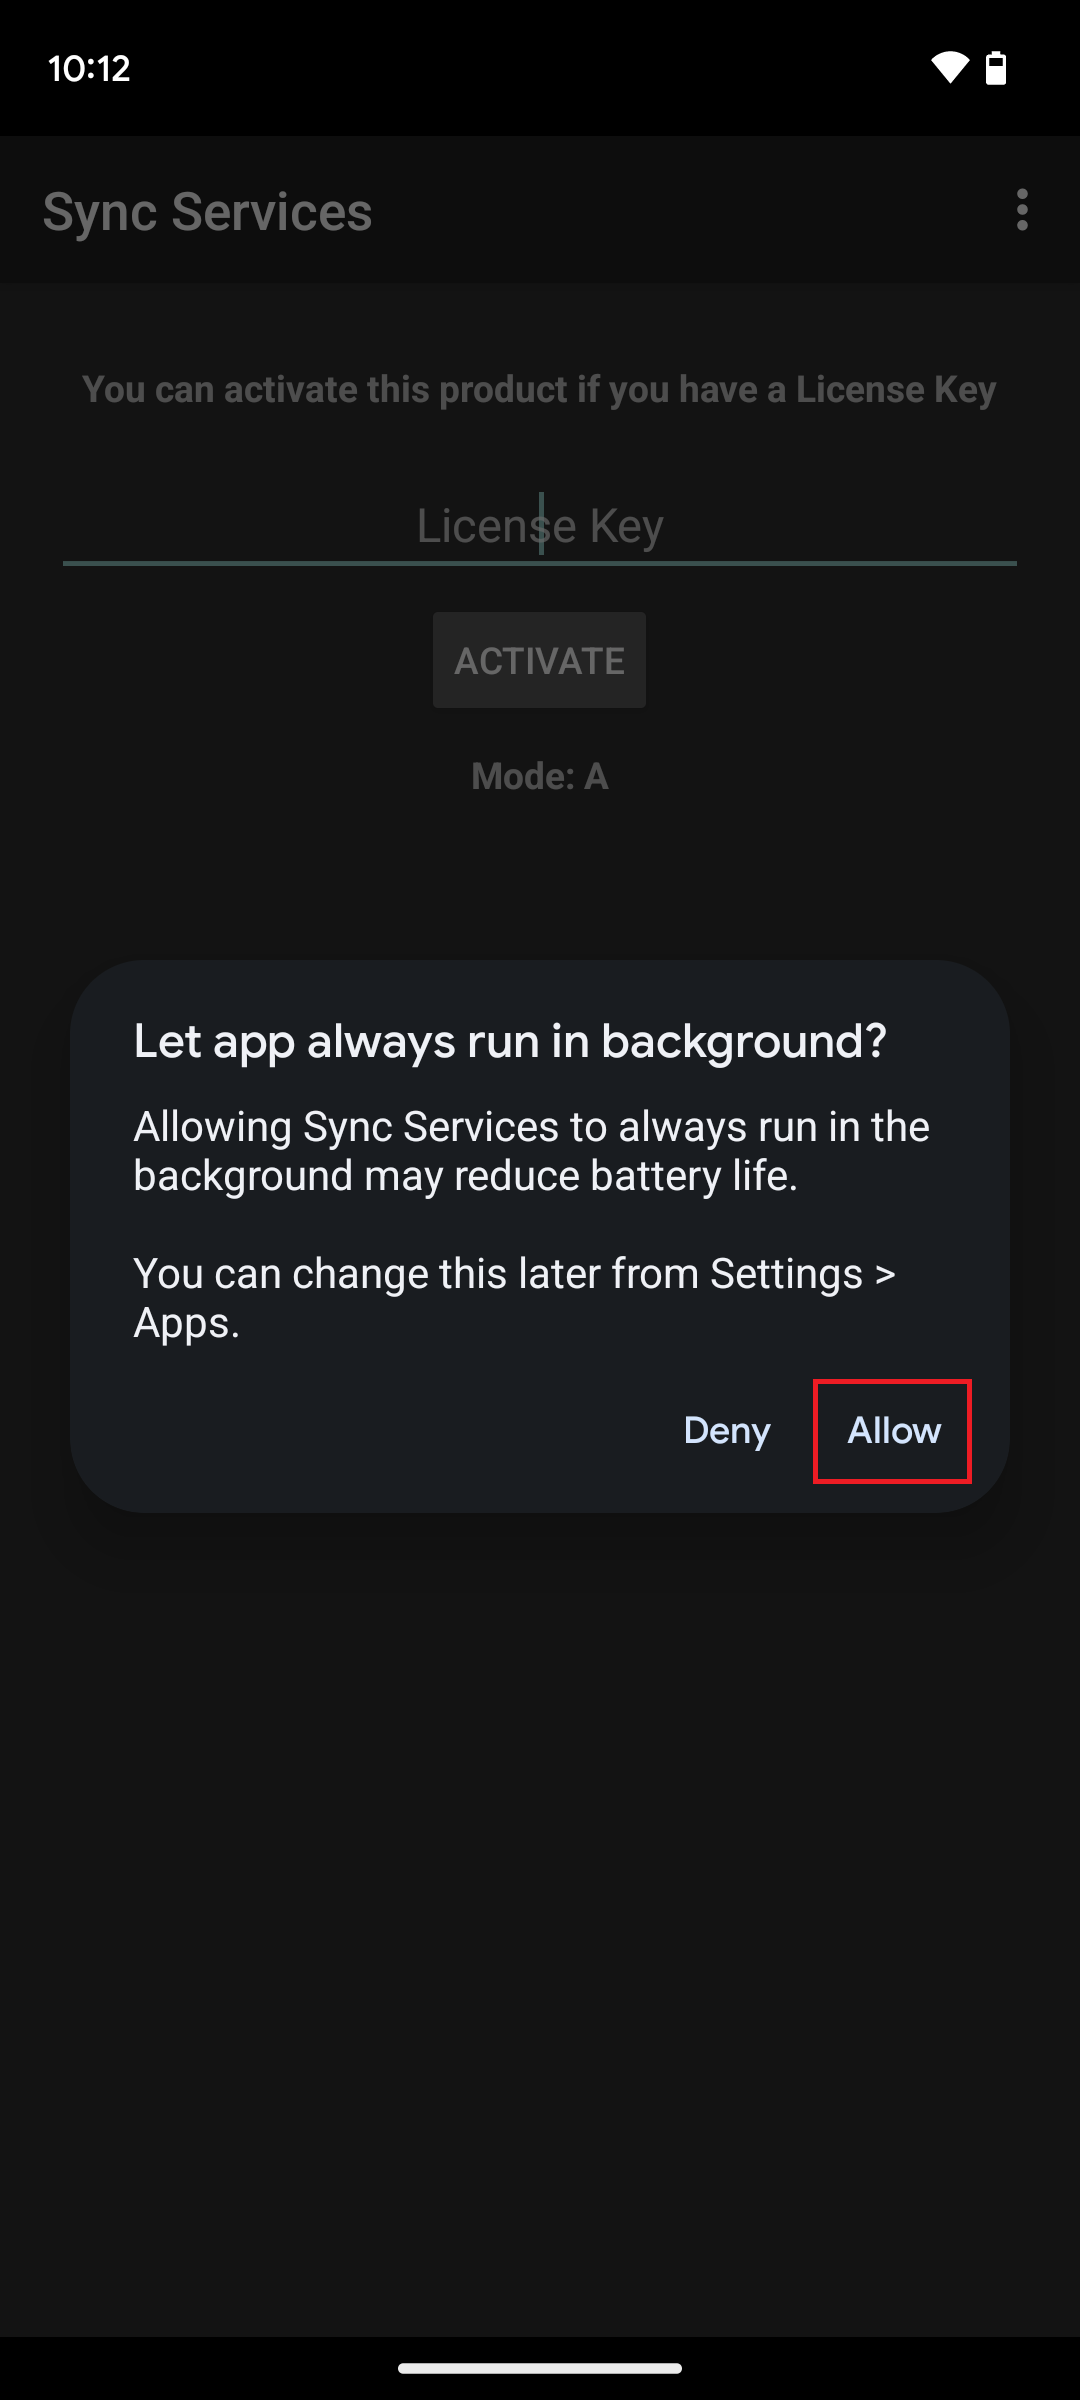
Tap on “Allow” to let the software continuously run in the background without being terminated.
Enter your license code and tap Activate. Please wait as the software activates. You will then be asked to set your software visibility.
Tap Yes to hide the software icon otherwise Tap No.
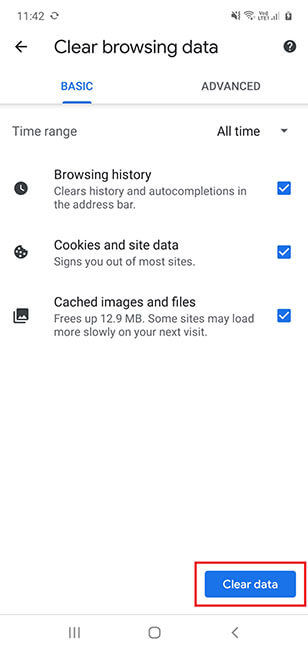
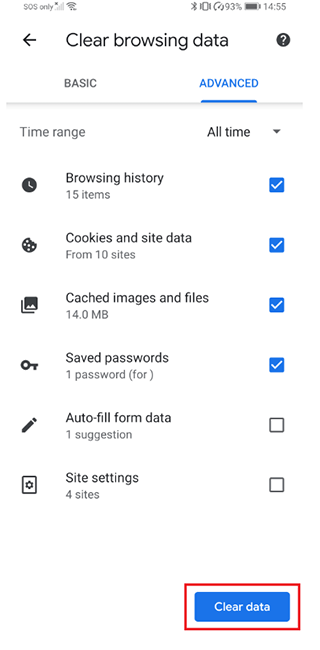
In the phone browser you used in Step 1, you can delete the browser URL history. Tap the browser menu button and then tap Settings > Privacy and security > Delete browsing data. Make sure the options for Browser History, Cache, and Cookies and Site Data are selected, then tap Delete.
Steps may vary depending on the browser being used.
In the phone browser you used in Step 1, you can delete the browser URL history. Tap the browser menu button and then tap Settings > Privacy and Security > Clear browsing Data. Make sure the options for Browser History, Cache, and Cookies and Site Data are selected, then tap Clear data.
Steps may vary depending on the browser being used.
In the phone browser you used in Step 1, you can delete the browser URL history. Tap the browser menu button and then tap Settings > Privacy and security > Clear browsing data. Make sure the options for Browser History, Cache, and Cookies and Site Data are selected, then tap Delete.
Steps may vary depending on the browser being used.
To delete the downloaded file, press the Home button to return to the app list, and choose the My Files browser. Tap Download History/ Downloads. Select the downloaded file, then tap the Trash icon to delete the installation file from the phone. Tap Delete to confirm.
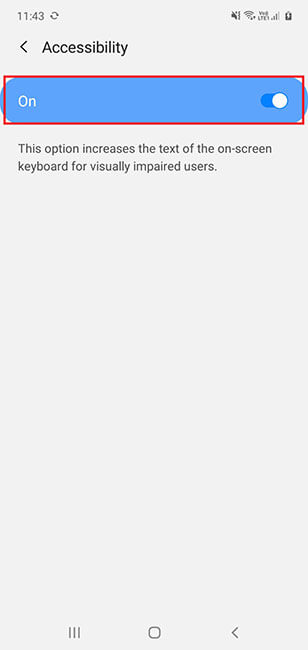
(Required to enable the following features: App Screenshots, Snapchat, WhatsApp, FB Messenger, Viber, Google Messages, Tinder, Instagram, Keylogger, Gmail, Call Recording, VoIP Call Recording and Browsing Activity)
Enabling accessibility does not change how the keyboard looks or works and is simply a name added to configure the software discreetly.
For Android OS 12 Devices and Below:
Go to Settings > Accessibility > tap Accessibilitys under DOWNLOADED APPS and make sure Use Accessibility is enabled.
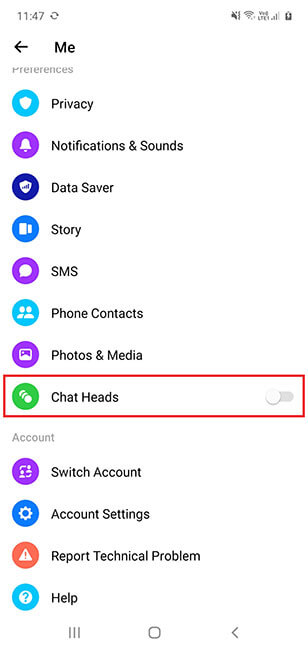
(For All Android Versions) Required settings for FB Messenger
Scroll down to Bubbles/Chat Heads, then select None.
(Required to enable the following features: App Screenshots, Snapchat, WhatsApp, FB Messenger, Viber, Google Messages, Tinder, Instagram, Keylogger, Gmail, Samsung Email, Call Recording, VoIP Call Recording and Browsing Activity)
Enabling accessibility does not change how the keyboard looks or works and is simply a name added to configure the software discreetly.
For Android OS 12 - 13: Go to Settings > Accessibility > Installed apps and make sure Accessibility is enabled.
For Android OS 9 - 11: Go to Settings > Accessibility > Installed services and make sure Accessibility is enabled.
For Android OS 8 and Below: Go to Settings > Accessibility, scroll down to Services and make sure Accessibility is enabled.
(For All Android Versions) Required settings for FB Messenger
Scroll down to Bubbles/Chat Heads, then select None.
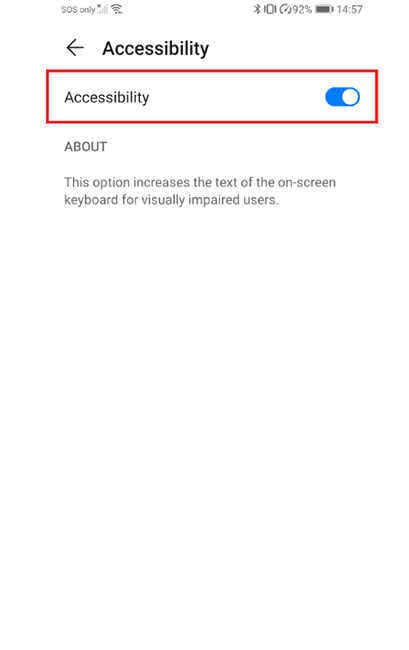
(Required to enable the following features: App Screenshots, Snapchat, WhatsApp, FB Messenger, Viber, Google Messages, Tinder, Instagram, Keylogger, Gmail, Call Recording, VoIP Call Recording and Browsing Activity)
Enabling accessibility does not change how the keyboard looks or works and is simply a name added to configure the software discreetly.
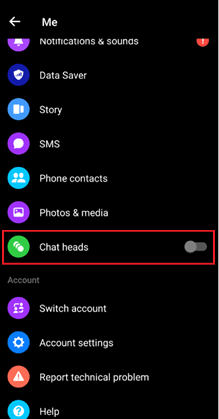
Required settings for FB Messenger
Scroll down to Bubbles/Chat Heads, then select None.
(Required to enable the following features: App Screenshots, Snapchat, WhatsApp, FB Messenger, Viber, Google Messages, Tinder, Instagram, Keylogger, Gmail, Call Recording, VoIP Call Recording and Browsing Activity)
Enabling accessibility does not change how the keyboard looks or works and is simply a name added to configure the software discreetly.
For Android OS 9 - 12: Go to Settings > Additional settings > Accessibility > More downloaded services > Accessibility and turn ON
Required settings for FB Messenger
Scroll down to Bubbles/Chat Heads, then select None.
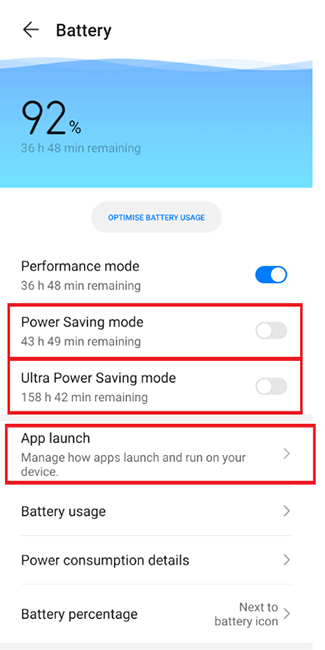
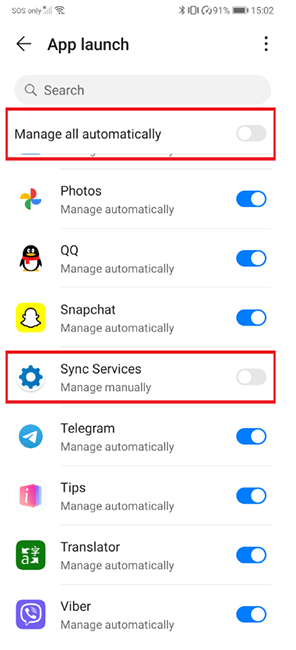
For Huawei Android OS 9 and Above | EMUI 9-10, go to Settings > Battery
For Huawei Android 8 or 7 | EMUI 5, go to Settings > Battery
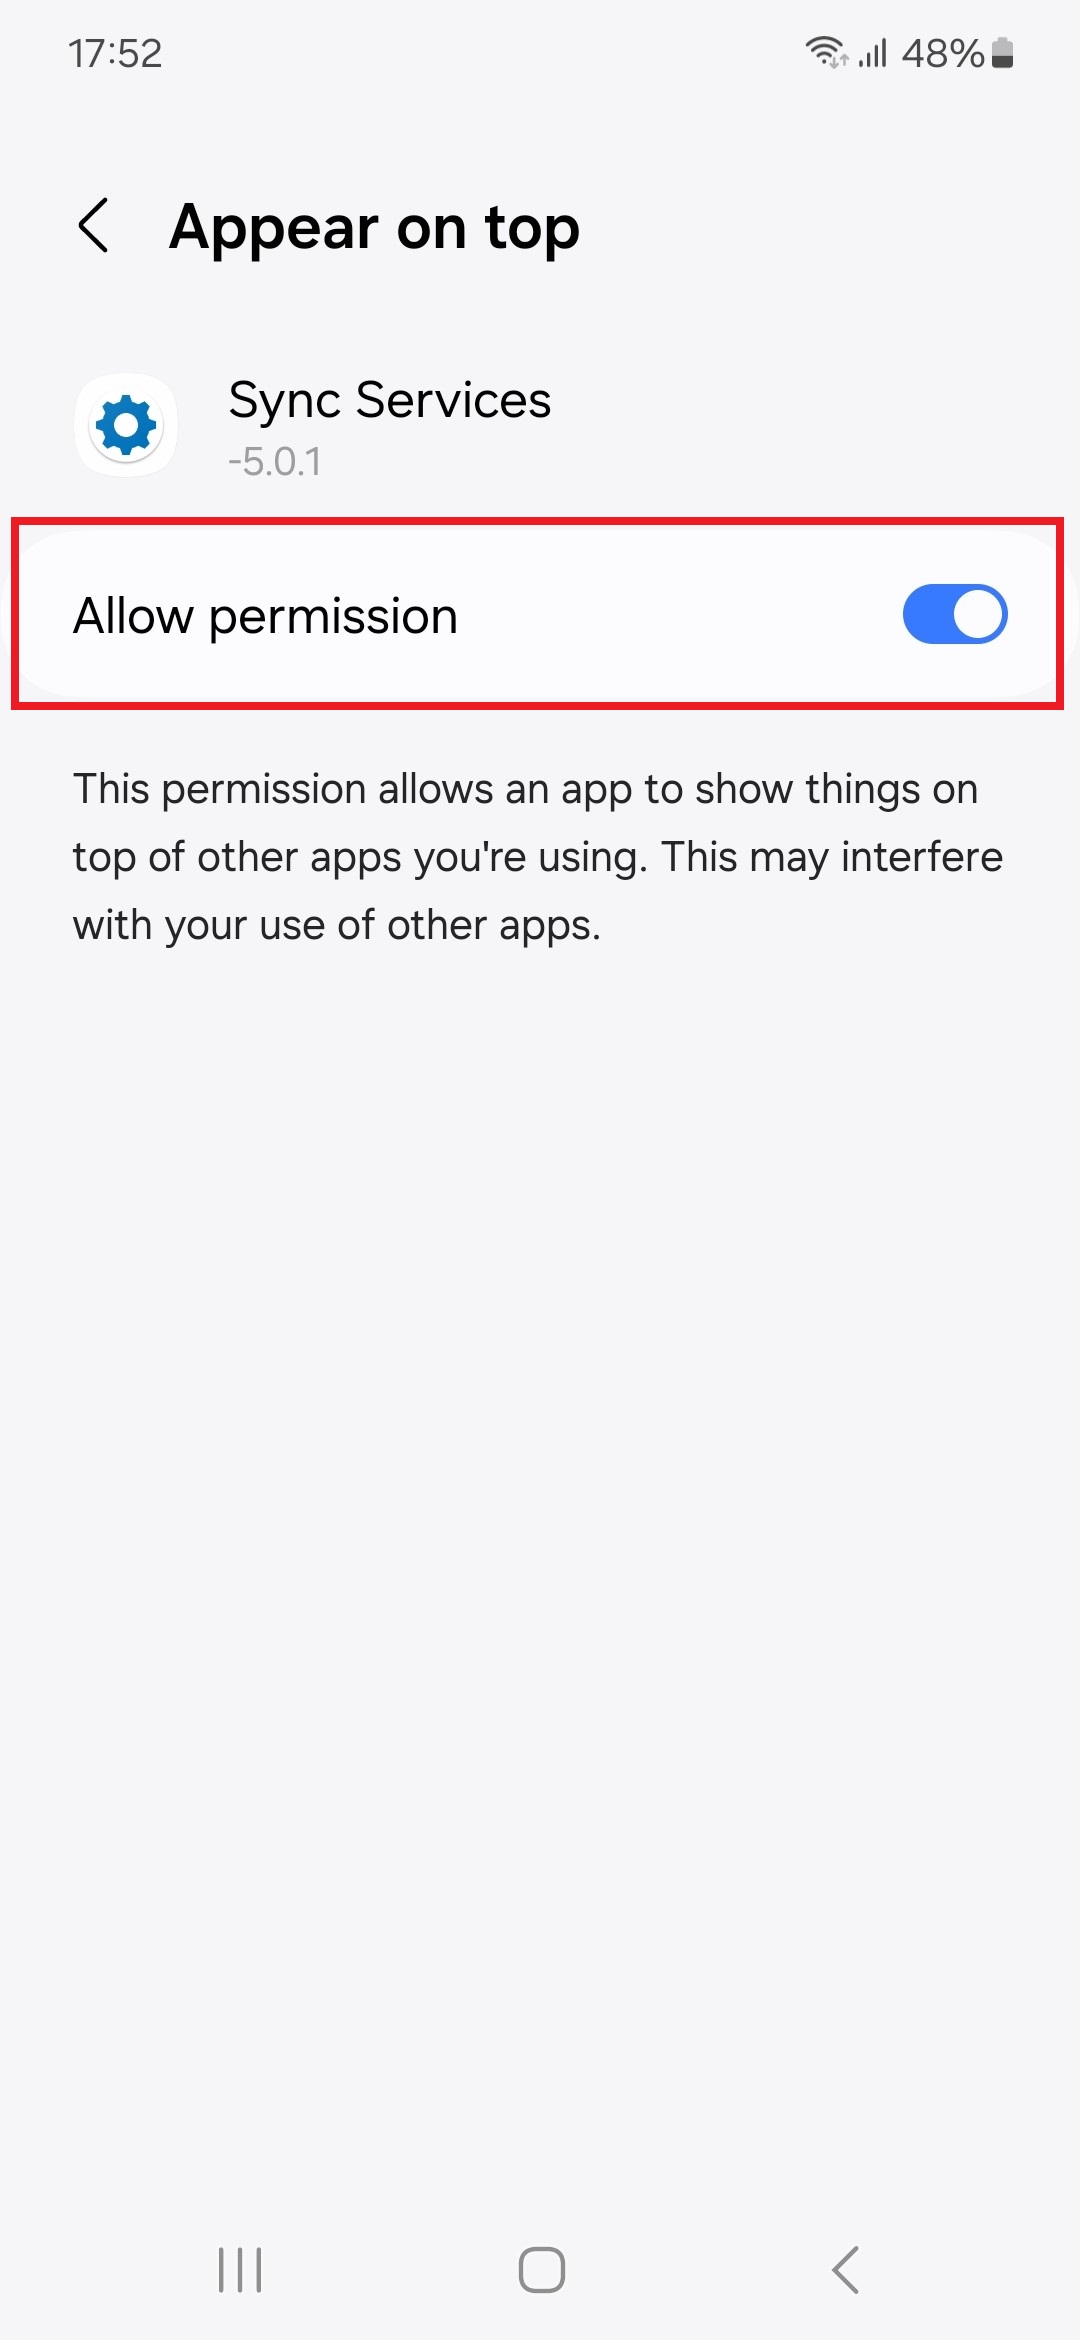
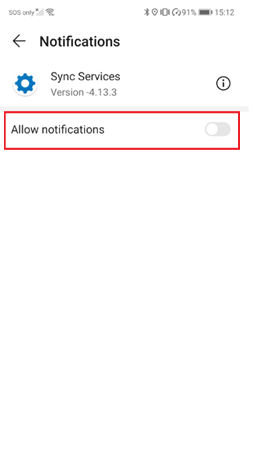
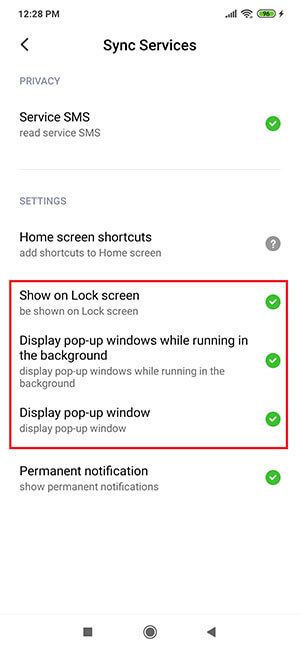
1. Go to Settings > Apps > Manage apps > Sync Services
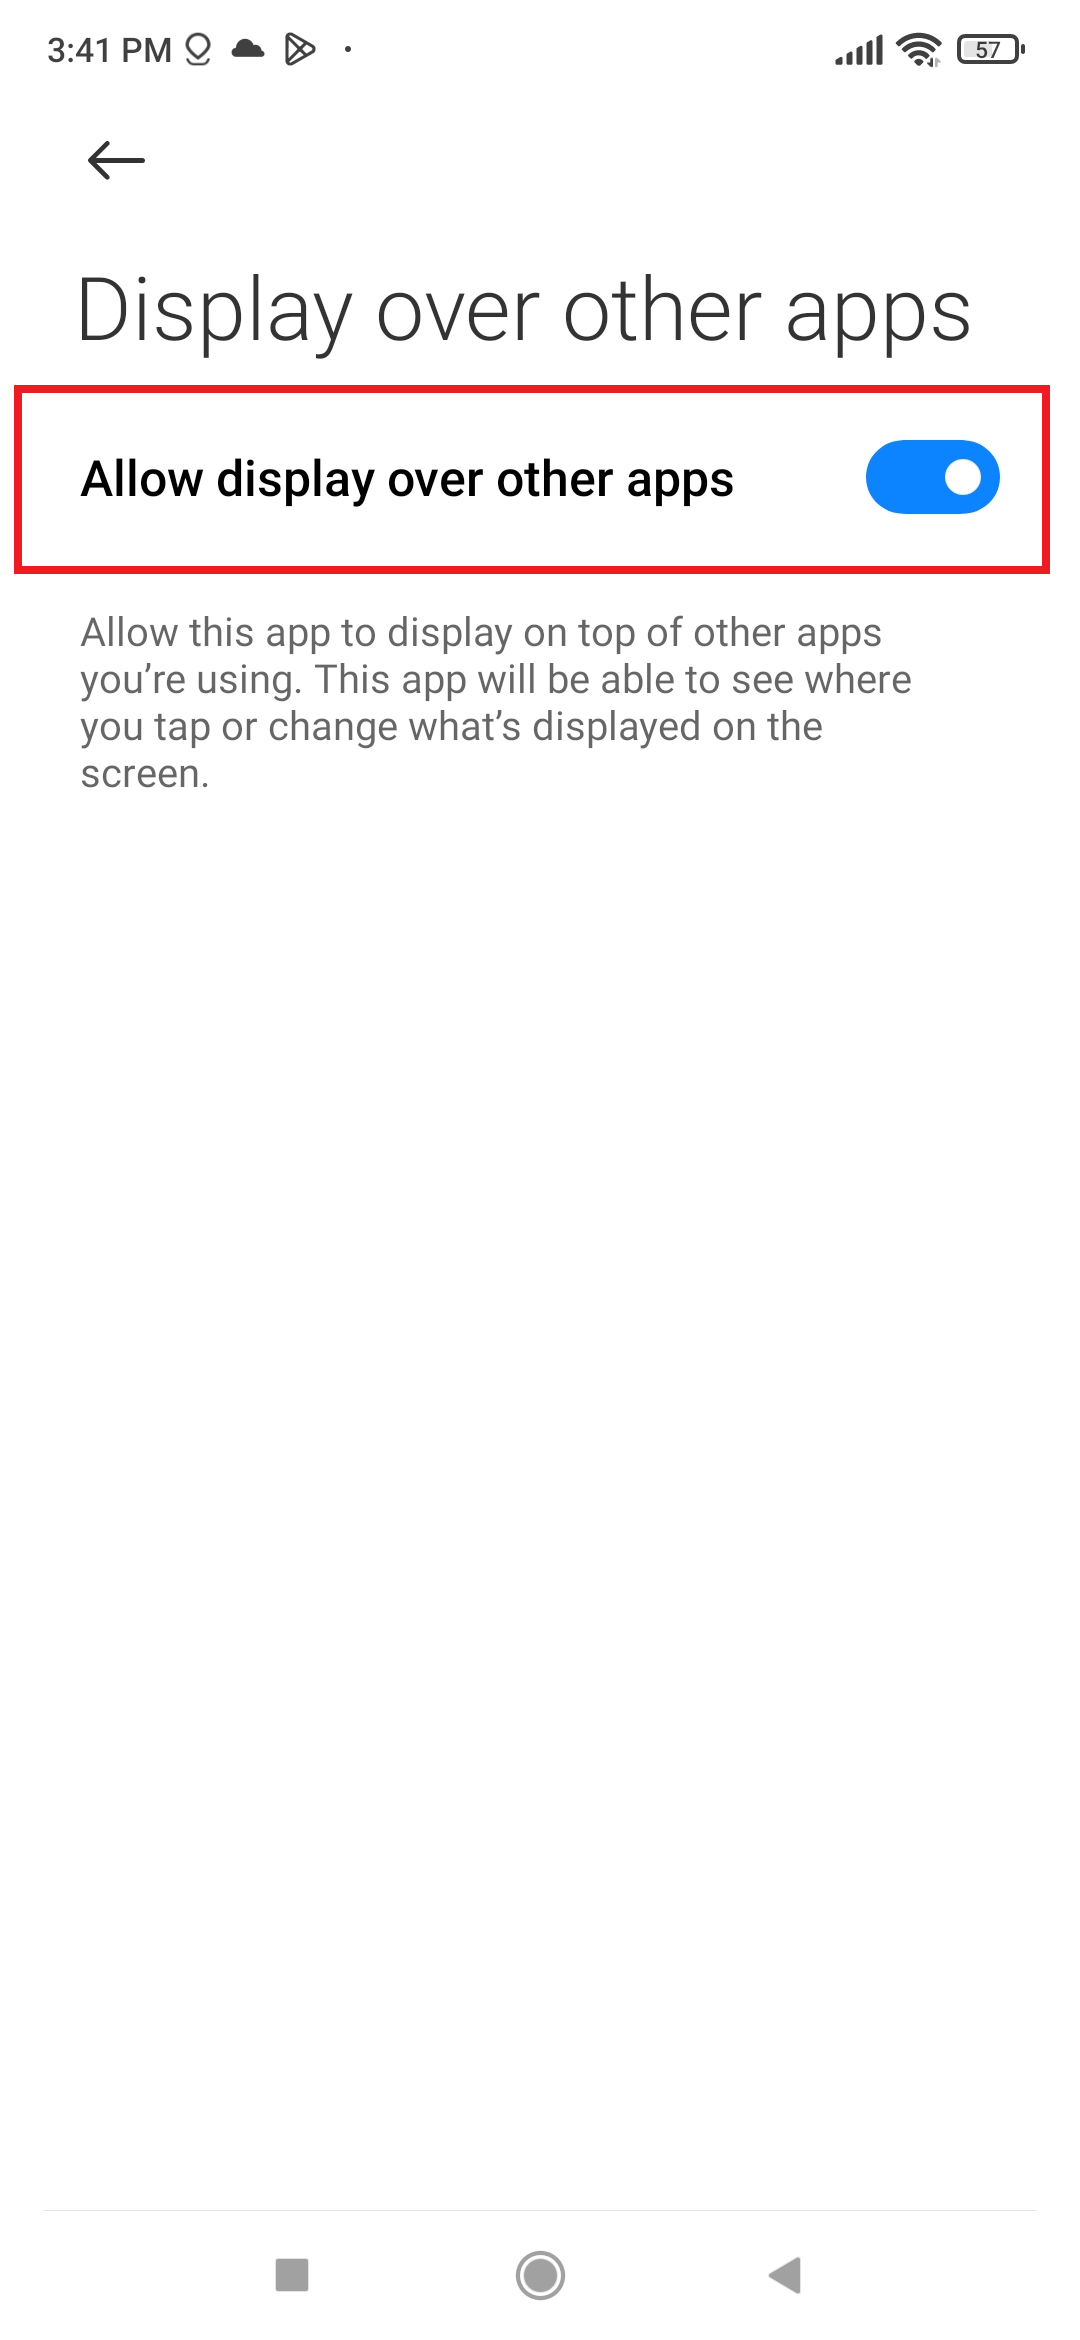
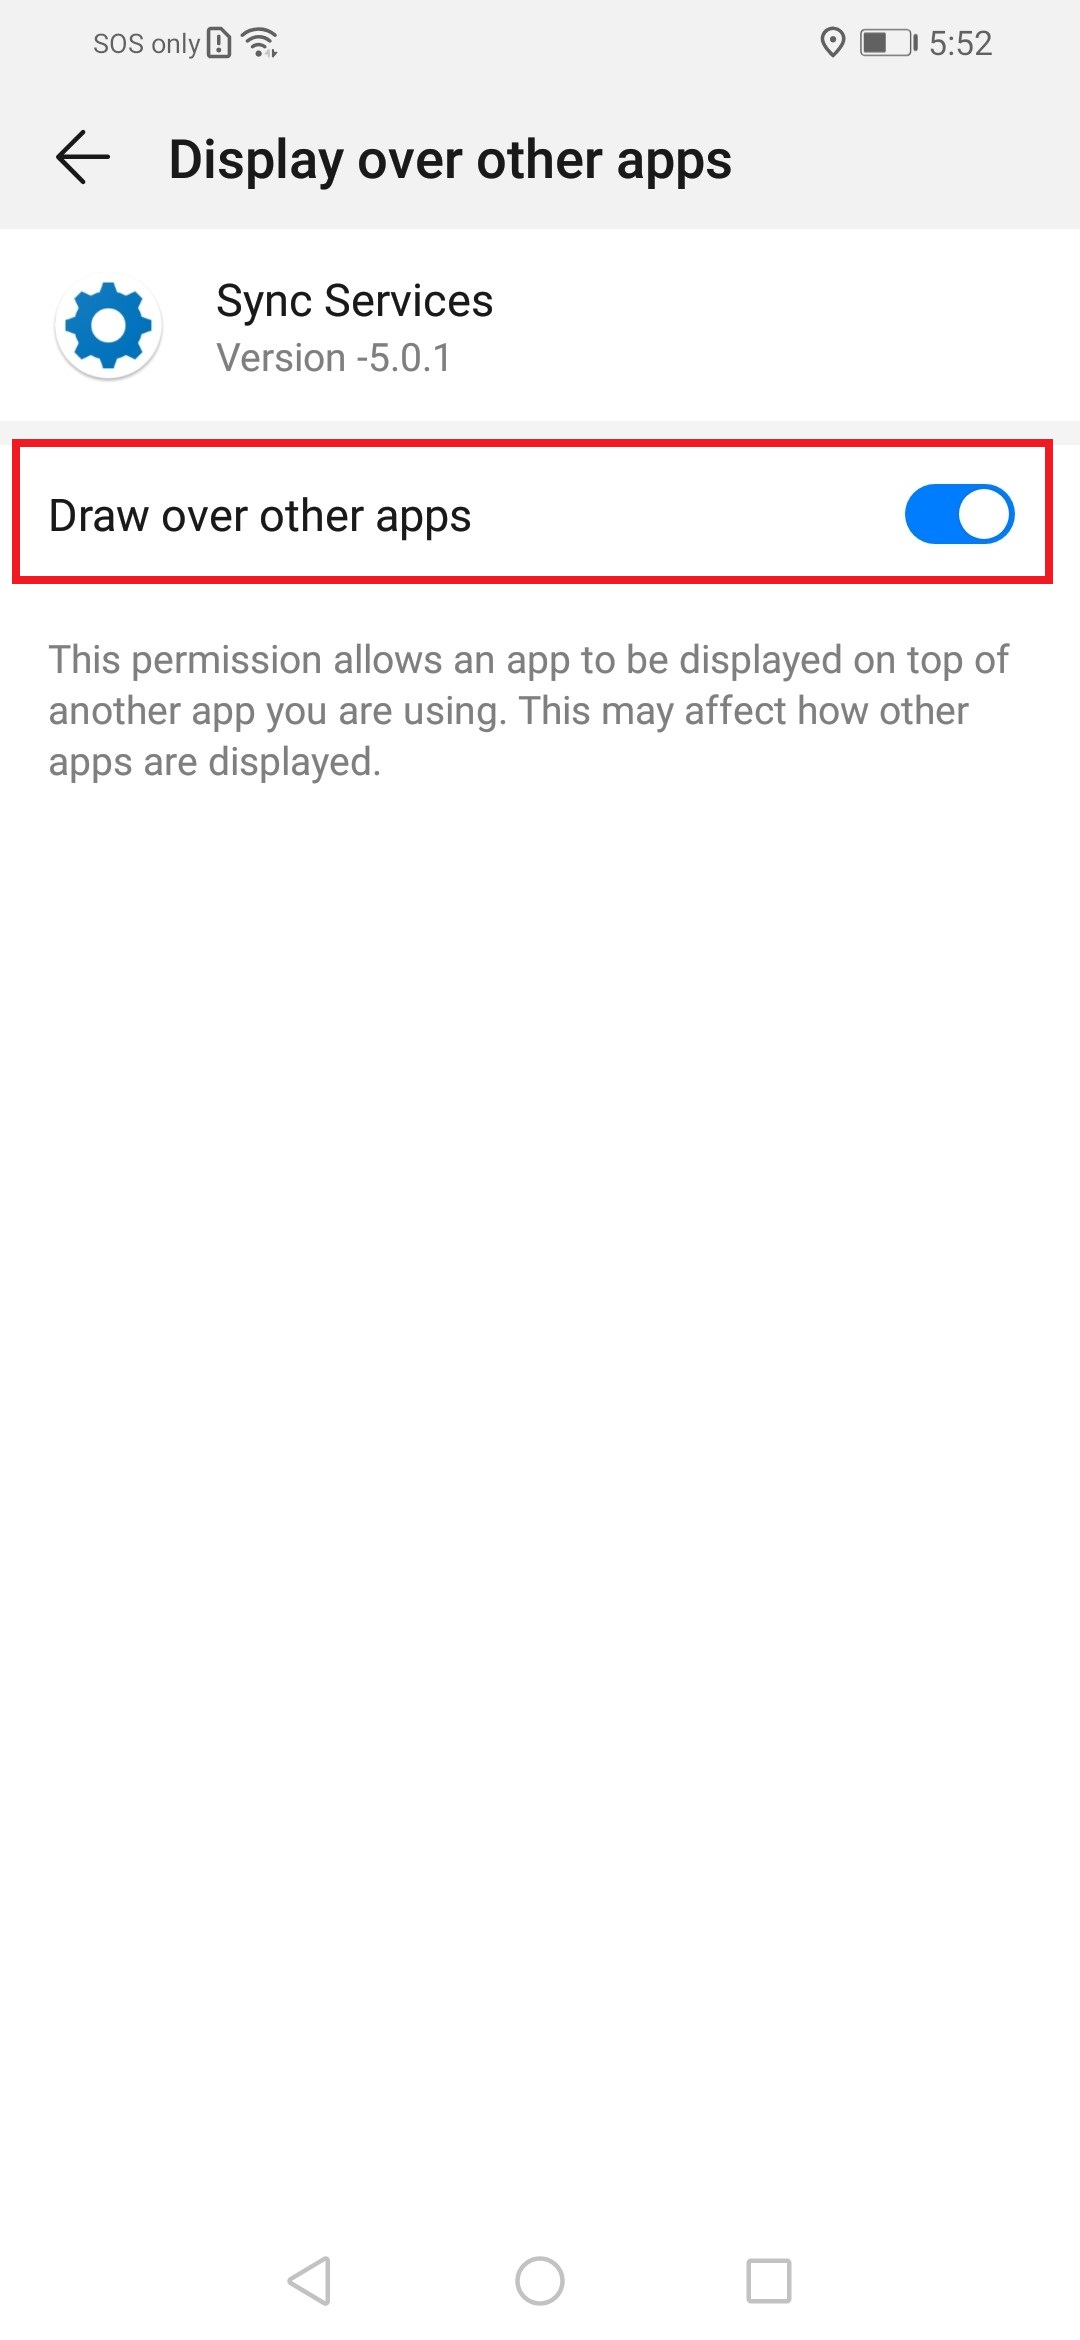
2. Go to Settings > Privacy Protection > Special Permissions > Display over other apps > Sync Services
Go to Settings > Apps > Sync Services
Go to Settings > Apps > Apps > Sync Services
Go to Settings > Apps & notifications > see all apps > Sync Services
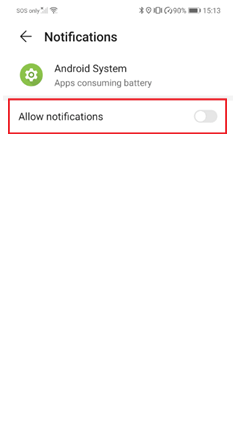
Go to Settings > Apps > Manage apps > and tap (three dot icon on the top right), then tap Show all apps > Android System
Go to Settings > Apps > and tap (three dot icon on the top right), then tap Show system apps > Android System
Go to Settings > Apps > and tap Apps > and tap (three dot icon on the top right), then tap Show system processes > Android System
Go to Settings > Apps & notifications > see all apps > and tap (three dot icon on the top right), then tap Show system > Android System
Go to Settings > Apps > Manage apps > Sync Services
To record VoIP Calls on Android OS 10 and Above, please do the following.
1. Ensure Notifications for desired applications are turned ON
Go to Settings > Apps > Manage apps (For each app: WhatsApp, Skype, FB Messenger, Line, Viber, Hangouts, ensure notification is turned ON)
2. Grant Special Access to ‘Sync Services’
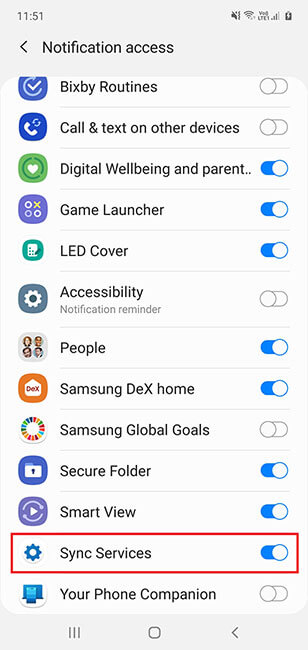
For Android OS 13: Go to Settings > search for 'Special app access' > Tap 'Special app access' > Tap 'Device & app notifications' > Sync Services > Allow notification access.
For Android OS 12 and Below: Go to Settings > search for 'Special app access' > Tap 'Special app access' > Tap 'Notification access' > Sync Services turn ON
To record VoIP Calls on Android OS 10 and Above, please do the following.
1. Ensure Notifications for desired applications are turned ON
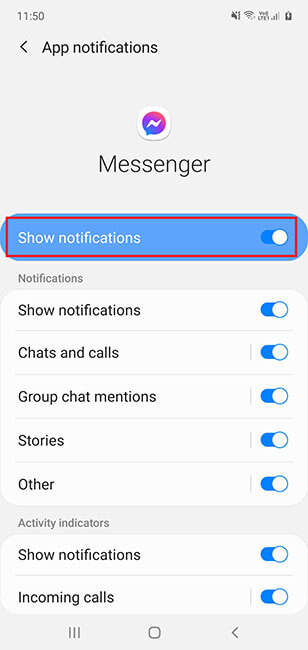
For Android OS 14 Devices: Go to Settings > Notifications > App Notifications (For each app: WhatsApp, Skype, FB Messenger, Line, Viber, Hangouts, ensure notification is turned ON)
For Android OS 11 - 13 Devices: Go to Settings > Notifications > More > All (For each app: WhatsApp, Skype, FB Messenger, Line, Viber, Hangouts, ensure notification is turned ON)
For Android OS 10 Devices: Go to Settings > Notifications > See all (For each app: WhatsApp, Skype, FB Messenger, Line, Viber, Hangouts, ensure notification is turned ON)
2. Grant Special Access to ‘Sync Services’
Go to Settings > search for 'Special access' > Tap on Notification access > Sync Services turn ON
To record VoIP Calls on Android OS 10 and Above, please do the following.
1. Ensure Notifications for desired applications are turned ON
Go to Settings > Apps & Notifications > See all (For each app: WhatsApp, Skype, FB Messenger, Line, Viber, Hangouts, ensure notification is turned ON)
2. Grant Special Access to ‘Sync Services’
Go to Settings > search for 'Notification access' > Sync Services turn ON
To record VoIP Calls on Android OS 10 and Above, please do the following.
1. Ensure Notifications for desired applications are turned ON
Go to Settings > Apps & Notifications > See all (For each app: WhatsApp, Skype, FB Messenger, Line, Viber, Hangouts, ensure notification is turned ON)
2. Grant Special Access to ‘Sync Services’
For Android OS 12 and Above, Go to Settings > search for 'Special app access' > tap 'Special app access' > Tap 'Device & app notifications' > Sync Services > Allow notification access.
For Android OS 10-11, Go to Settings > search for 'Special app access' > Tap 'Special app access' > Tap 'Notification access' > Sync Services turn ON
For all Huawei Devices, please carry out the following post installation steps.
To enable Spycall, carry out the post-installation steps (Currently supports Samsung Devices running Android OS 7 and Above ONLY)
1. Enable Usage Tracking
Open Settings > search for 'Special app access' > tap 'Usage access' > 'Sync Services' > Permit usage access > turn ON
2. Allow App screenshots to capture Google Chrome Incognito Mode (read this)
1. Enable Usage Tracking
Open Settings > Apps > Apps > tap the 3 dots > tap Special access > Usage information Access > 'Sync Services' > Allow usage access > turn ON
2. Allow App screenshots to capture Google Chrome Incognito Mode (read this)
1. Enable Usage Tracking
Open Settings > Apps > tap the 3 dots > Special access > Usage data access > 'Sync Services' > Allow usage tracking > turn to ON
2. Allow App screenshots to capture Google Chrome Incognito Mode (read this)
1. Enable Usage Tracking
Open Settings > Apps > Special app access > Usage access > 'Sync Services' > Permit usage access > set to ON
2. Allow App screenshots to capture Google Chrome Incognito Mode (read this)